How to Create HTML Forms
You can add a form to an existing HTML document inside the
tags. These tags act as a container for all of your form data, such as text fields, lists, and buttons. When someone submits information through your form, the data will be sent to a sever that will save, process, send, or display results based on the content. Learn how to set up the
tag so your form does what you want, as well as how to add inputs to collect information.
Steps

Building the Form Tag

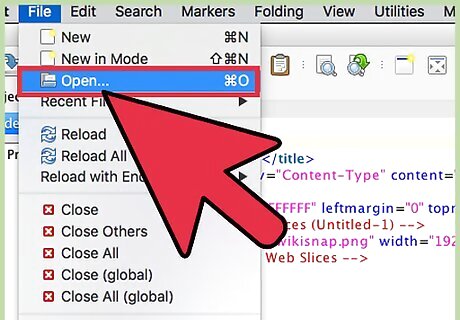
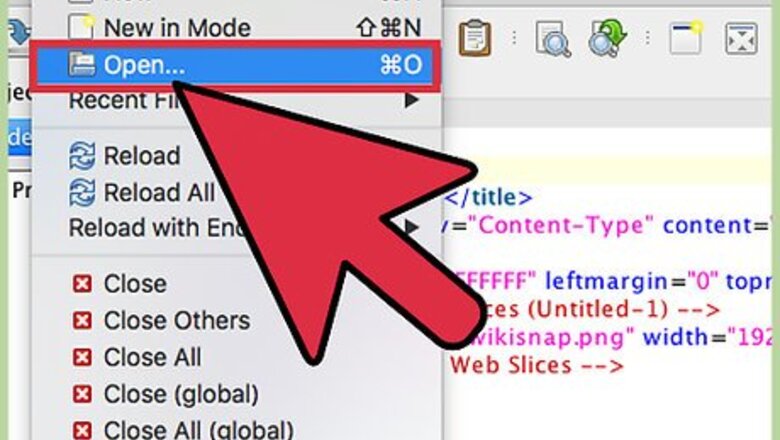
Open your HTML document in your preferred text editor. The content of an HTML form must be typed within the and tags. These tags act as a container for your form, like other container tags like

and
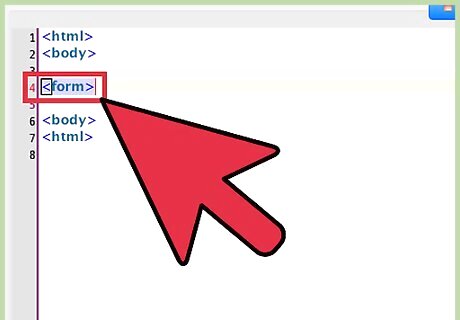
You can use CSS or HTML inside the
tags to make your form look the way you want.

Open the

element. To start your form, scroll to the location in your file where the form should begin and type on its own line. This tag signifies the beginning of your form.

Add the “action=” attribute to the tag. This tells the tag what to do with the form data. You’ll define this by adding action=”path_to_script” to the tag. For example: (if the script that will parse the form data is located in a directory on your server called “cgi-bin”). If the script is on another server: To send the form data to an email address (not a script):

Decide how the form data will be sent. Now that you’ve defined where the form data will be sent, you must decide whether your form will “GET” or “POST” the data. Then, you will add either “GET” or “POST” as the method attribute inside the tag. Use method=”get” to request data from a resource. You should only use GET to retrieve data. Never use GET with sensitive information like passwords or social security numbers. Use method=”post” to submit data to be processed. Use this if the form data is sensitive, such as for passwords or credit card numbers. The end result should follow this format:

Adding Form Options

Create a text box using . You can add a blank box in which your visitors can type their names, comments, or anything else you may need. Start this on a new line after the tag. For example, First Name: creates a text box prefaced by “First Name:” so users know what to type into the box. Change the “id=” value (“name” in the example) to match what you’re doing with the data. If the data is sent to a script, this value should correspond with something in the script.

Create a password box. If your script calls for a user to enter a password, you’ll add another , this time with the “type” attribute set to “password.” On a new line, type Password:

Add radio buttons for options. If you’d like visitors to choose from a list of items, create a list of options with radio buttons. To do this, you’ll use the tag with the “type” attribute set to “radio”. To create a radio buttons to select either “Dog” or “Cat”: Dog Cat A group of radio buttons should all have the same “name” attribute.

Learn more advanced form options. There are so many types of inputs and lists you can include in your form. A great way to expand your HTML form knowledge is to browse W3school’s HTML Forms site. Additionally, there are many helpful wikiHows articles to walk you through setting up items like selectable lists, reset/clear buttons, and check boxes.

Closing Your Form

Create a Submit Replace “Send your message” with the text you want to appear on the button.

Type

at the end of the form. This tag indicates that the form is over. Remember, all form content must be inside
and
.

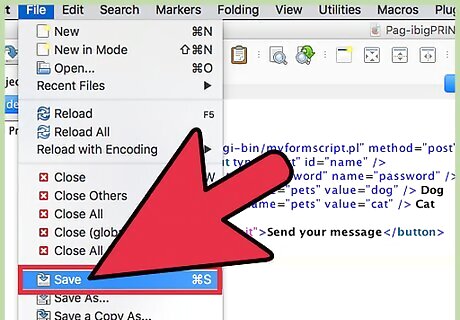
Upload your document to your web server. Now that you’ve added a form to your HTML document, upload it to your web server and give it a test run!

What's your reaction?

Comments

https://kapitoshka.info/assets/images/user-avatar-s.jpg

0 comment

Write the first comment for this!