
Before You Begin

Understand the risks. Before you begin, there are a few risks associated with hacking your Nintendo Switch that you need to be aware of. You assume the risks by following this guide. The risks are as follows: You could brick your Nintendo Switch. This is rare, but by modifying your system, there is a possibility that you could permanently damage your system and render it unable to boot up or play games. To prevent this, read this guide in it's entirety before you begin and follow the instructions exactly. Going online with a hacked Nintendo Switch could get your Nintendo account banned. Be careful when going online with a hacked Switch.
Check if your Nintendo Switch can be hacked. Not all Nintendo Switches can be hacked. Newer models, as well as Nintendo Switch Lite and OLED models, have been patched to prevent hacking. If you have one of these models, the only way to hack it is to disassemble it and install a mod chip, which is beyond the scope of this guide. Use the following steps to check and see if your Switch can be hacked: Check the serial number on the bottom of your Switch. Go to https://ismyswitchpatched.com/ in a web browser. Use the drop-down menu to select the serial number prefix (If you don't see your prefix, it's probably a newer model that has been patched). Enter your Switch's serial number in the bar. Check the results. If your Switch has not been patched, you can continue. If it has been patched, you cannot continue. Some serial numbers are unknown if they've been patched or not. If you have one of these serial numbers, you won't know if your Switch has been patched or not until you try to enter recovery mode.

Get what you need. You will need the following items to hack your Switch: A Micro SD Card that has at least 128 GB of storage space. A Windows computer with an SD card reader. A Micro SD card adapter. A USB-C charging cable you can use to connect your Nintendo Switch to your PC. Am RCM Jig (used to enter Recovery mode. You can order one from Amazon for under $10).

Change your DNS settings. Normally when you connect to Wi-Fi, the DNS settings are set automatically. Changing your DNS settings will prevent your switch from sending information to Nintendo that may get your account banned. It will also block system updates, and game updates as well as prevent you from accessing the eShop. Use the following steps to change your DNS settings. : Open the Settings menu. Select Internet. Select Internet Settings. Select your internet connection. Select Change Settings Select DNS Settings. Select Manual. Set the Primary DNS to 207.246.121.077 if you live in North America. For the rest of the world, set it to 163.172.141.219. Set the Secondary DNS to 163.172.141.219 if you live in North America. For the rest of the work, set it to 207.246.121.077 Select Save.
Preparing the SD Card

Insert the Micro SD card into your computer. You will need an SD Card that has at least 128 GB of storage. Insert it into your computer's SD card reader. If your computer does not have a Micro SD card reader, you can use an SD card adapter or a USB adapter. If you are using a micro SD card that has already been used on your Nintendo Switch, save a backup of the "Nintendo" folder and the "Games" folder to your computer. If you are using new micro SD card, make sure it is formatted in FAT32 format. If your Nintendo Switch has been updated, you can format it in ExFAT format.
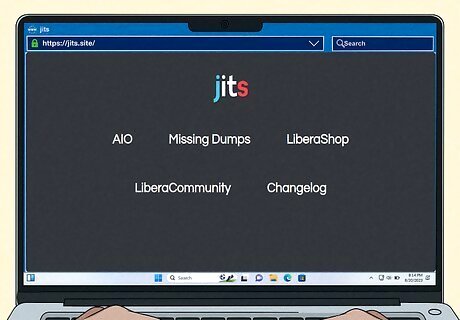
Go to https://jits.site/ in a web browser. This website will automatically download a ZIP file that contains all the folders and files that you will need to install on your SD card. If the download doesn't start automatically, check your antivirus settings and reload the website.

Extract the contents of the ZIP file you just downloaded. Your downloaded files can be found in your Downloads folder by default. Unzip the "JustInsertTheStuff.zip" file and extract the contents of this folder to a safe location on your computer.

Set the "Fusee.bin" file aside. This file is the payload that you will deliver to your Nintendo Switch later on. Move this file to a separate location on your computer apart from the other files and folders in the "JustInsertTheStuff" folder that you just unzipped.
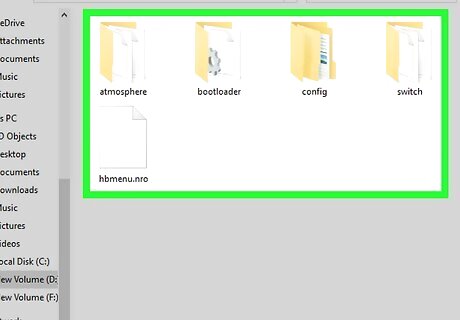
Copy the rest of the files to the root of your micro SD card. When your micro SD card is inserted in your computer, it should appear as a new drive in File Explorer or Finder on Mac. After setting the Fusee.bin file aside, copy the rest of the files in the "JustInsertTheStuff" folder and paste them into the root of your micro SD card. Make sure you are copying and pasting the files and folders inside the "JustInserttheStuff" folder and not the folder itself. They do not need to be placed inside any other folders on the microSD card.
Power off your Nintendo Switch and reinsert the micro SD card. Your micro SD card has been formatted with the files it needs. You can eject it from your computer and reinsert it into your Switch. Make sure your Switch is powered off first.
Sending the Payload to the Switch

Download TegraRcmGUI. Use the following steps to do so: Go to https://github.com/eliboa/TegraRcmGUI/releases/tag/2.6 in a web browser. Scroll down and click TegraRcmGUI_v2.6_Installer.msi below "Assets". Alternatively, you can click the ZIP file to download it inside of a ZIP file.
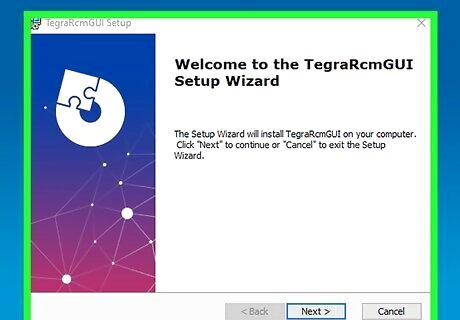
Install TegraRcmGUI. If you downloaded the ".msi" file, click the file in your Downloads folder and follow the instructions to complete the installation. If you downloaded the ZIP file, extract the contents of the ZIP file.
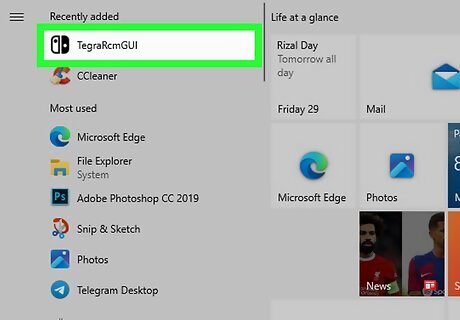
Launch TegraRcmGUI. It has a black icon that resembles the Nintendo Switch logo. If you used the MSI file to install it, it will be in the folder you installed it in. If you downloaded the zip file, it will be the executable file in the "TegraRcmGUI_v2.6_portable" folder inside the extracted folder. Click the TegraRcmGUI.exe file to launch

Install the APX driver. When you open TegraRcmGUI, you should be prompted to install the APX driver. Click Yes to install the driver. If you are not prompted, click the Settings tab and then click Install Driver.
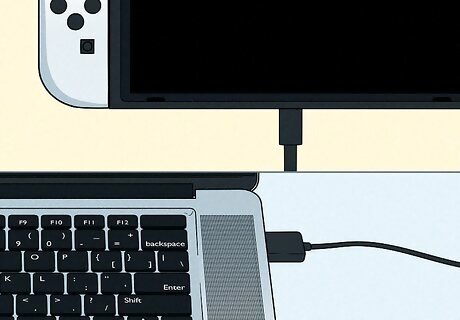
Connect your Nintendo Switch to your PC. Make sure your Nintendo Switch is powered off. Then connect it to your PC using a USB-C-to-C or USB-C-to-A charging cable. If your Nintendo Switch powers on when you connect it, go ahead and power it back off again.

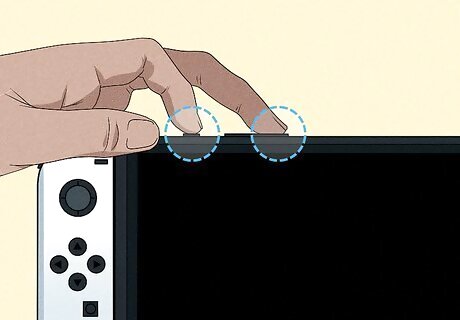
Insert the RCM jig. To do so, make sure both joy-cons are detached from the Nintendo Switch, insert the RCM jig into the right joy-con rail, and slide it down to the bottom of the rail. There are methods for crafting your own RCM Jig out of a paperclip. This is a risk of damaging the joy-con controller pins using this methods, but you may prefer the method if you like to do things yourself.
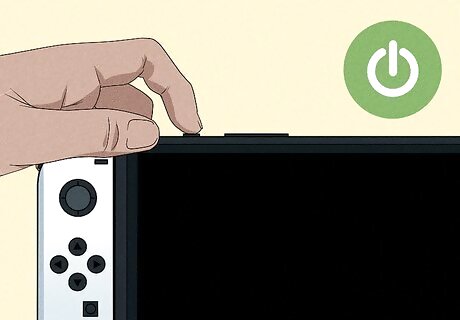
Press and hold the Power+Volume Up at the same time. Both buttons are on the top of your Nintendo Switch. This will boot your Nintendo Switch into Recovery Mode (RCM), but the screen will remain off. It should say "RCM Ok" in the lower-left corner of the TegraRcmGUI menu.
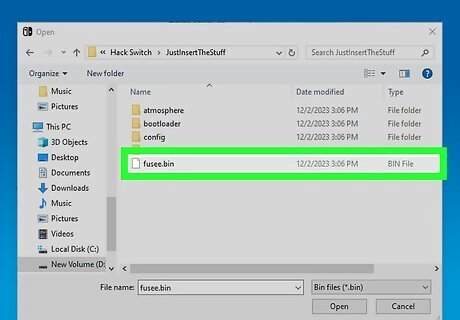
Select the "Fusee.bin" file. To do so, click the Payload tab in the TegraRcmGUI window. Click the icon that resembles a folder and select the "Fusee.bin" file you set aside. Then click Open.

Click Inject Payload. This will inject the payload into your Nintendo Switch. Your Nintendo Switch should now boot into Atmosphere Custom Firmware. Congratulations, your Nintendo Switch has been hacked.
Downloading Games from HBG Shop

Select Album from the Switch home menu. Once your Switch boots into Atmosphere CFW, select Album to access the Homebrew menu.
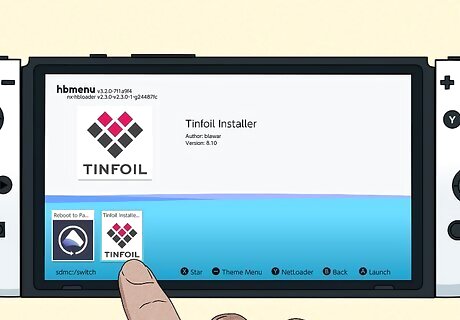
Select Tinfoil Installer. This will install the Tin Foil application to your Home menu.
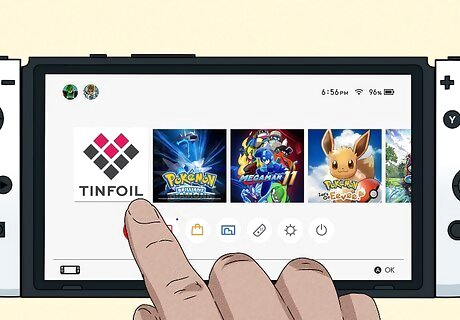
Open Tinfoil. You can select Tinfoil on your Switch home menu to open it.
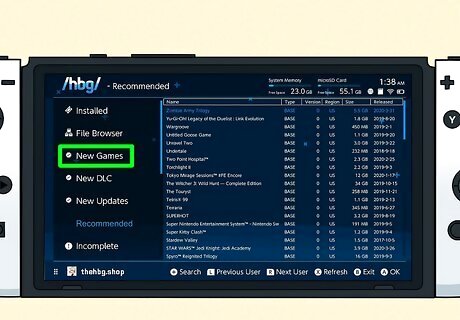
Select New Game. It's in the menu bar to the left. This displays a variety of Nintendo Switch games you can download.
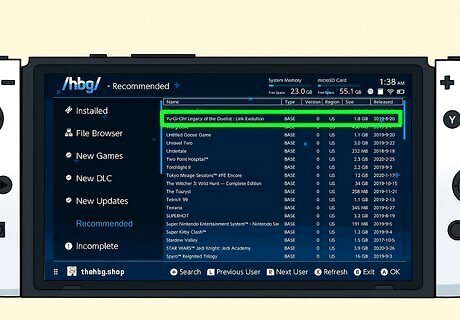
Select a game you want to install. Scroll through the list of games. Once you find a game you want to install, highlight it and press "A" to select it.
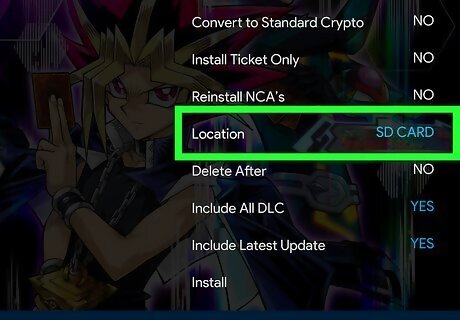
Select where you want to install the game. Use the drop-down menu next to "Location" to select "SD card" or "Internal Storage."
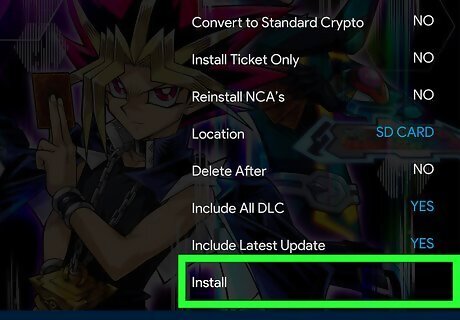
Select Install. This installs the game. You can opens installed Games on your Nintendo Switch home menu.


Comments
0 comment