
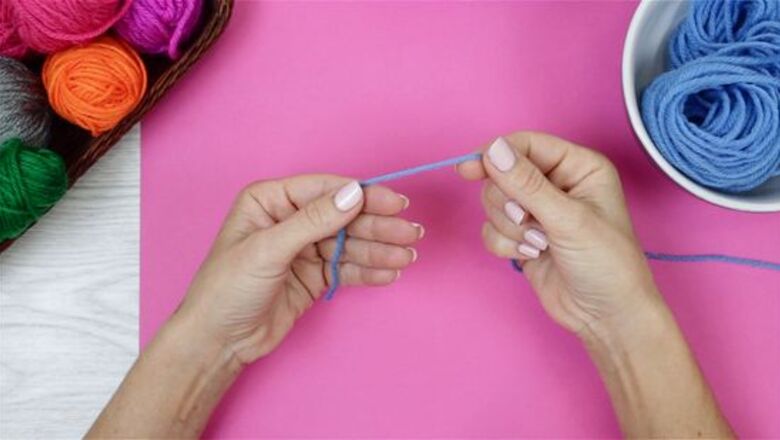
Using the Finger Wrap Technique

Pinch the yarn between your thumb and forefinger. Hold the string just above the end, leaving about 1 inch (2.5 cm) of excess. The longer end of the yarn can be placed in a bowl or on a table while you wind. If a friend or family member is with you, ask them to hold the yarn skein in-between their arms for a smoother wind.

Wrap the long end of the yarn around your fingers. Use your free hand to wind the longer end of the string (the piece connected to the rest of your skein or hank) around the ends of your fingers. Wrap the string 20 to 30 times until you have a thick roll of yarn around your fingers. Spread your fingers slightly apart while you wind, so the roll doesn’t get too tight. Keep the yarn from falling off your fingers by wrapping it between your knuckles and fingertips.

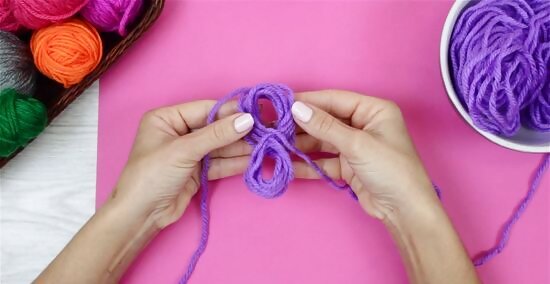
Slide the yarn roll off your hand, and squish it into an “8” shape. Press the middle of the roll together with the thumb and forefinger of your other hand, and pull gently until the hand you were wrapping is free. Then, place the roll in your palm and wrap your thumb and pointer finger around the center. Leave about 2 inches (5.1 cm) of the roll end outside your grip.

Wrap yarn around the roll’s center and over your thumb. Take the string still attached to the skein and fold it around where the connecting part of an “8” would be (right above the curve between your thumb and pointer finger). Repeat for 20 to 30 wraps. Keeping your thumb in the center while you wrap will ensure the ball isn’t too tight.

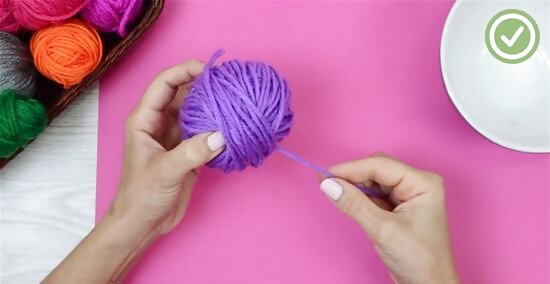
Slip your thumb out of the wrap and continue wrapping. Spin the roll at a 45-degree angle and wrap 20 to 25 times, moving from corner to corner. Turn another 45 degrees and repeat. Continue this until you have a ball. As the ball forms, you’ll be able to spin the yarn around while continuously wrapping. Tuck the end of the string into the ball once you’re done to keep your yarn ball nice and secure.
Winding with the Thumb Wrap Approach

Grasp the end of yarn in your hand, making a “thumb’s up” sign. Close your fingers around the string, leaving about an 1 inch (2.5 cm) of excess at the bottom.

Wrap the yarn around your extended thumb 5 to 10 times. Take the end of the yarn still connected to the skein, and bring it around the base of your thumb. Try holding your thumb horizontally, as this can make it easier to wrap.

Angle the yarn as you wrap 5 to 10 more times. Cross the string over the previous wraps to create a criss-cross pattern. Moving your thumb with the wrap can help beginner yarn winders.

Keep criss-crossing the yarn as you wrap until your thumb disappears. With each wrap, the ball will get bigger and bigger, but keep going until you can’t see your thumb poking out of the yarn.

Pull the yarn ball off your thumb and continue wrapping. Carefully slide your thumb out of the yarn, pushing in any string that may slide out. Keep wrapping in a criss-cross pattern until your skein is all balled up.
Using the Center Pull Technique

Place the yarn in your palm as if you were going to grab it. Lay the end piece across your palm, with the end connected to the skein or hank draped over your hand between your thumb and pointer finger. Leave about 2 to 3 inches (5.1 to 7.6 cm) of excess string as this will be the center pull.

Wrap the yarn between your fingers in a figure “8.” Pinch the string over your palm with the side of your thumb. Then, take the piece of string still connected to the skein and wrap it down and around your pinky and ring finger and up and around the pointer and middle finger. Repeat this for around 20 to 30 wraps. Be careful not to wrap too tightly—you should still be able to wiggle your fingers and loosen the string.
Slide the yarn off your fingers and fold it in half. Carefully pull the figure “8” off your hand. Fold the roll of yarn in half where the “8” connects in the middle. Leave the tail of excess string hanging out, and pinch the folded roll between your thumb, pointer, and middle fingers.
Wrap the yarn roll over your fingers and thumb. Bring the longest string up and around the yarn roll and the fingers pinching it (including your thumb). Keep wrapping until a ball forms. Wrapping your fingers and thumb will keep the ball from getting too tight. Rotate where you pinch the roll for a rounder yarn ball. Move around the tail of excess string, checking that it’s out of the wrapping altogether.
Trying the Cardboard Square Approach

Cut a notch in a cardboard square. Use a leftover cardboard box and cut out a 1 inch (2.5 cm) by 1 inch (2.5 cm) square with a pair of scissors or box cutter. Then, take your scissor or box cutter and cut a line halfway through the square. If you don’t have an extra piece of cardboard, use a piece of cardstock.

Slide one end of the yarn through the notch. Leave just enough excess so that the string doesn’t slip out.
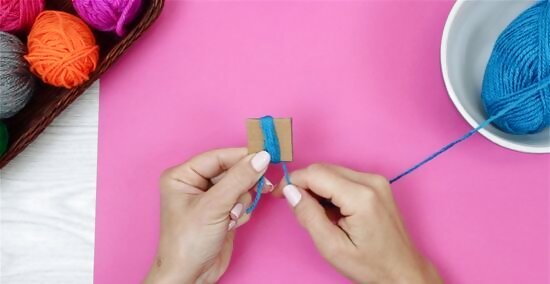
Wrap the yarn around the square vertically. Take the string attached to the skein and bring it up and over the yarn you slipped into the notch. Keep wrapping over the excess string for 10 to 15 rotations.
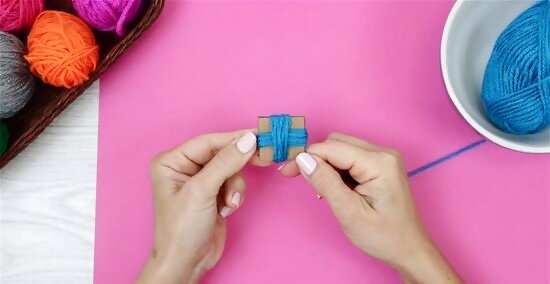
Turn the square onto another side and continue wrapping. Rotate the square in your hand so that the vertical roll you just wrapped is horizontal. Wrap over the roll 10 to 15 more times to create a criss-cross pattern.

Keep rotating and wrapping until a ball forms. As you rotate and wrap, your cardboard square will disappear. Continue your criss-cross wrapping pattern until all the yarn is in your ball. Tuck the end of your yarn under a string in the ball to keep it secure.


Comments
0 comment